TUAKA DRIVE - Quickstart guide
1. Mechanical installation
1.1 Preparing the structure, screws and cables
-
Before installation, the structure must be properly aligned and cleaned.
-
The screws required for installation should be provided. The design of the screw connections must be carried out by the customer, an example can be found here [...].
-
Flat receptacles in the following sizes are required for the supply cable:
TUAKA 103 - 4.75 x 0.51mm
TUAKA 107 - 6.35 x 0.81mm -
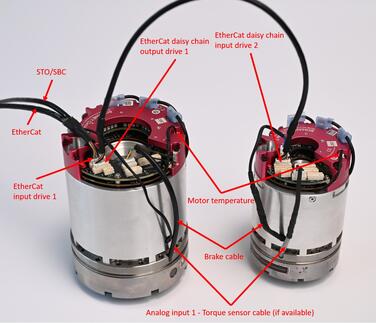
An 8-wire JST cable is required for the EtherCAT/STO cable. The configuration can be viewed under the following link:
The cable can be purchased at:
SOMANET CIRCULO ETHERNET+3S Y-SPLITTER CABLE, MASTER TO DRIVE (2M)
1.2 Install the cables and the TUAKA into the structure
Insert the supply and communication cables (power, EtherCAT/STO) into the structure. Then carefully insert the actuator into the structure and align the screw hole pattern of the actuator with the screw hole pattern of the structure. The fitting on the outer diameter of the gearbox can be used for alignment.
Caution: Do not damage the supply and communication cables during installation!
Ensure that the cables are routed neatly during installation.
1.3 Mechanical installation, fixing the actuator
For the following mechanical assembly, it is important to use suitable tools (such as a torque wrench) and to observe the prescribed tightening torques to ensure proper assembly. The screws must be fully tightened. If a fitting is used between the actuator and the structure, the actuator may only be fully pulled into the end position when the screws are tightened. It is therefore essential to check and ensure the correct end position.
1.4 Connecting the cables
The actuator can now be connected. To do this, connect the EtherCAT cable to the input of the driver, then connect the supply cable to GRD and 48V.
The actuator is now fully installed mechanically.
1.5 Further assembly
Next, the other parts can be mounted on the output shaft, repeat steps 1 to 4 if necessary.
Note that the TUAKA Drive can be easily daisy chained. For an overview of the cabeling see https://sumitomo-r-and-d.atlassian.net/wiki/spaces/DOC/pages/427327490/TUAKA+DRIVE+-+Quickstart+guide#2.-Overview-of-the-cables
1.7 Software setup of the TUAKA drives
The TUAKA Drive is delivered fully configured. However, the controller must be parameterized for the respective application. For this, see the guide https://sumitomo-r-and-d.atlassian.net/wiki/spaces/DOC/pages/396689431/Driver+Somanet+Circulo+DRIVE#Taking-the-drive-into-operation
2. Overview of the cables
