TUAKA ACTIVE - Quickstart guide
1. Mechanical installation
1.1 Preparing the structure, screws and cables
The structure must be aligned and cleaned before installation.
Provide the necessary screws according to the individual system and calculation (provided by the customer).
Suitable phase cables are required for the supply line. We recommend a cable cross-section of 1.5 mm² with a maximum cable length of 0,5 m.
1.2 Install the cables
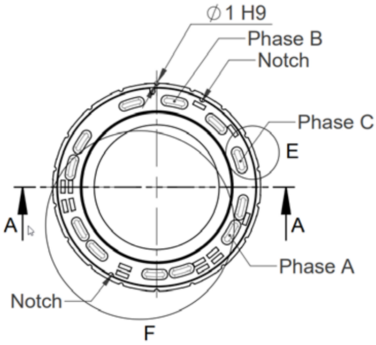
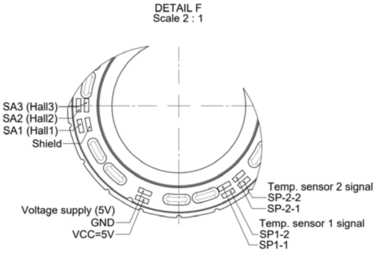
The phase cables must then be properly soldered to the board.
To do this, the cables must be soldered to the soldering surfaces provided for this purpose (see following illustration).
These instructions only apply to the motor cables and temperature sensors as shown in the diagrams:


1.3 Mechanical installation, fixing the actuator
Insert the actuator into the structure.
Ensure that the cables are not pinched.
When the actuator is aligned, gently press it into the structure.
Tighten the screws from the opposite side according to the calculation.
Make sure that the actuator is not jammed and is pulled straight into the structure.
Caution: It is essential to avoid jamming.
1.4 Installing the driver
After mechanical installation, the external driver must be installed according to the manufacturer's instructions.
1.5 Additional temperature sensor
Alternatively, the temperature sensors built into the motor can be used in addition to the motor phase cable.
Appropriate cables must be used.
We recommend a cable cross-section of 0,35 mm² with a maximum cable length of 0,5 m.